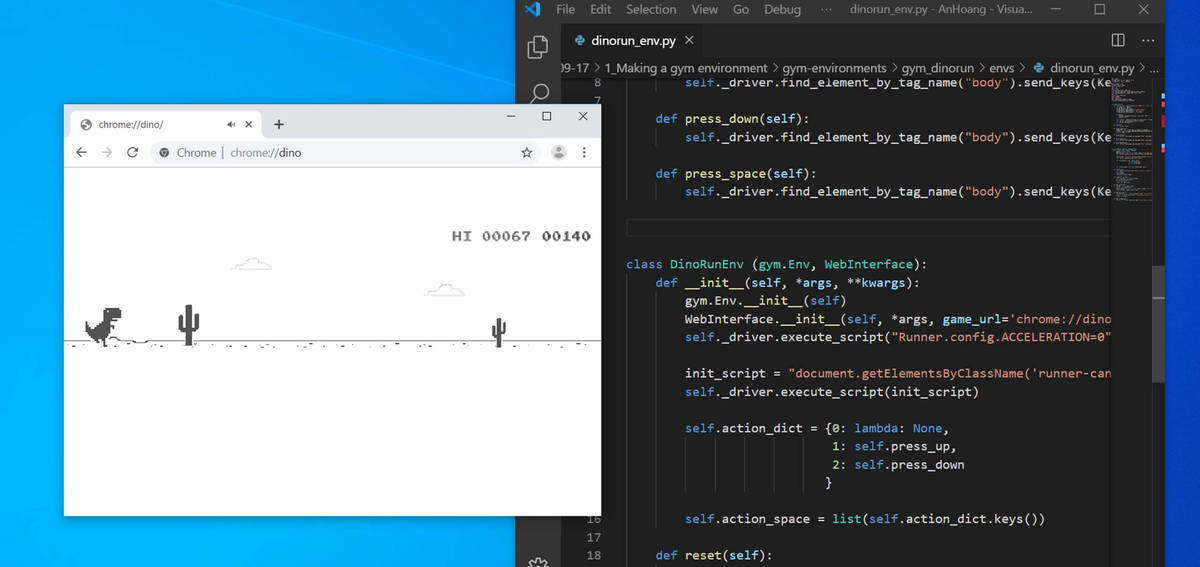
The goal of this blog series is to teach an agent how to play the chrome browser game „Dino Run“.
In this first article, we will create an interface between the agent and the game so that the agent can control the dino.
We will write an interface that is based on the gym environment. The gym environment is used by many reinforcement learning agents and can be easily shared and installed.
As we want to train our agent on an EC2 instance the game must run on a headless browser. We will solve this by creating a virtual display.
1. Interacting with the browser using selenium
In order to interact with the browser game, we make use of selenium. This module is used for Web UI automation and we will use it to interact with the browser from a python script. Let’s start with importing all the important selenium modules.
from selenium import webdriver
from selenium.webdriver.chrome.options import Options
from selenium.webdriver.common.keys import Key
selenium can interact with many browsers. For this article, we chose to go with google chrome.
First, we need to make sure that a recent version of google chrome is installed. If not, it can be downloaded from www.google.com/chrome/. Secondly, we need a compatible selenium driver for the installed chrome version so that selenium can interact with the browser. This can be downloaded from chromedriver.chromium.org/downloads.
After that, we have to set the path to the chrome driver:
chrome_driver_path = "path/to/chromedriver"The following code shows hot to open a browser window with selenium and go to a chosen website.
web_driver = webdriver.Chrome(executable_path = chrome_driver_path) # create window
web_driver.get("https://www.google.de") # go to website
selenium allows us to set brower options. We mute the audio and disable the infobar, since we don’t need either of those.
chrome_options = Options()
chrome_options.add_argument("disable-infobars")
chrome_options.add_argument("--mute-audio")

web_driver = webdriver.Chrome(executable_path = chrome_driver_path, chrome_options = Options) # create window
web_driver.get("https://www.google.de") # go to website
In order to play the game the programm needs to „see“ what is going on in the browser. This is solved by taking screenshots of the browser window.
Taking a screenshot in selenium returns a base64 encoded image. For further processing this image is converted to a numpy array.
from selenium import webdriver
from io import BytesIO
import base64
import numpy as np
from PIL import Image

image_b64 = driver.get_screenshot_as_base64()
screen = np.array(Image.open(BytesIO(base64.b64decode(image_b64))))
With the screenshot method we get an image of the whole browser window. This image contains a lot of empty white spaces in addition to the game graphics. We can crop the unnecessary part of the screen by slicing the numpy array.
screen = screen[100:300, 200:450]To be able to play the game programatically we have to send commands like jumping or ducking by pressing the up and down arrow. With selenium we can easily send button presses to the game using the .send_keys() command.
from selenium.webdriver.common.keys import Key
web_driver.find_element_by_tag_name("body").send_keys(Keys.ARROW_UP) #Here we press "up"
2. Making it headless
Later, we want to train our model on an AWS EC2 instance. This EC2 instance has no monitor attached. Hence, the browser has to run in headless mode.
Turns out, simply running the driver in headless mode with „add_argument=headless“ does not work. When running the browser in headless mode, the javascript code of the browser game does not get rendered. Instead, one can make the browser „headless“ by running a virtual display using the python module pyvirtualdisplay (Note, that this only works on Linux !). That virtual disokay finally renderes the javascript code. To install it using conda we execute the bash commands below.
$ conda install -c conda-forge pyvirtualdisplayA new virtual display can be set up in python using the code below. All graphical operations are performed in virtual memory without showing any screen output.
from pyvirtualdisplay import Display
display = Display(visible=0, size=(1024, 768))
display.start()
3. Putting it all together into a class
The code created so far, is wrapped into a WebInterface class. This class is later used as a superclass for our games.
class WebInterface:
    def __init__(self, custom_config=True, game_url='chrome://dino', headless = False, chrome_driver_path = "./chromedriver.exe"):
        self.game_url = game_url
        chrome_options = Options()
        chrome_options.add_argument("disable-infobars")
        chrome_options.add_argument("--mute-audio")
        chrome_options.add_argument('--no-sandbox')

        if headless:
            display = Display(visible=0, size=(1024, 768))
            display.start()

        self._driver = webdriver.Chrome(executable_path = chrome_driver_path,chrome_options=chrome_options)
        self._driver.set_window_position(x=-10,y=0)
        self._driver.get(game_url)

    def end(self):
        self._driver.close()

    def grab_screen(self):
        image_b64 = self._driver.get_screenshot_as_base64()
        screen = np.array(Image.open(BytesIO(base64.b64decode(image_b64))))
        return screen[...,:3]

    def press_up(self):
        self._driver.find_element_by_tag_name("body").send_keys(Keys.ARROW_UP)

    def press_down(self):
        self._driver.find_element_by_tag_name("body").send_keys(Keys.ARROW_DOWN)

    def press_space(self):
        self._driver.find_element_by_tag_name("body").send_keys(Keys.SPACE)
4. Making it a gym environment
Now that the basic code for the interface between game and python in done, we turn to packing it into a gym environment for easy use and sharing. But first we need to install the gym module. This can be done with either conda or pip
$ conda install -c hcc gymor
$ pip install gymBefore we start to program the environment, gym requires a specific file and folder structure.
gym-environments/
    README.md
    setup.py
    gym_dinorun/
        __init__.py
        envs/
            __init__.py
            dinorun_env.py
The README.md can contain a short description of your environment. In install_requires we can set required modules that are installed concurrent to the gym environment itself. The file gym-enviroments/setup.py should contain the following code.
from setuptools import setup

setup(name='gym_dinorun,
      version='0.1',
      install_requires=['gym', 'selenium', 'numpy', 'pillow', 'pyvirtualdisplay', 'matplotlib']
)
The
gym-environment/gym_dinorun/__init__.py should contain the following lines. The id is the name we will later use to call our environment.
from gym.envs.registration import register

register(id='DinoRun-v0',
    entry_point='gym_dinorun.envs:DinoRunEnv',
)
The file gym-environment/gym_dinorun/__init__.py only contains
from gym_dinorun.envs.dinorun_env import DinoRunEnvThe core of the gym environment is gym-environments/gym_dinorun/envs/dinorun_env.py that contains the code of the game interface. The gym API methods that we need to implement are:
step(): Runs one timestep of the game. After that it returns the next state, a reward, and a bool that indicates the end of an episodereset(): Resets the state of the environment and returns an initial observation.close(): Closes the environment
And the following attributes have to be set:
action_space: The space object corresponding to valid actionsobservation_space: The space object corresponding to valid observationsreward_range: A tuple corresponding to the min and max possible rewards
We implement the dino gym environment by subclassing our handy WebInterface class.
import gym
from gym import error, spaces, utils
from gym.utils import seeding

class DinoRunEnv (gym.Env, WebInterface):
    def __init__(self, *args, **kwargs):
        gym.Env.__init__(self)
        WebInterface.__init__(self, *args, game_url='chrome://dino', **kwargs)
        self._driver.execute_script("Runner.config.ACCELERATION=0")

        init_script = "document.getElementsByClassName('runner-canvas')[0].id = 'runner-canvas'"
        self._driver.execute_script(init_script)

        self.action_dict = {0: lambda: None,
                            1: self.press_up,
                            2: self.press_down
                           }

        self.action_space = spaces.discrete.Discrete(3)
        self.reward_range = (-1,0.1)


    def reset(self):
        self._driver.execute_script("Runner.instance_.restart()")
        self.step(1)
        time.sleep(2)
        return self.grab_screen()

    def step(self, action):
        assert action in self.action_space
        self.action_dict[action]()
        return self.get_info()

    def get_info(self):
        screen =  self.grab_screen()
        score = self.get_score()
        done, reward = (True, -1) if self.get_crashed() else (False, 0.1)
        return screen, reward, score, done

    def get_score(self):
        score_array = self._driver.execute_script("return Runner.instance_.distanceMeter.digits")
        score = ''.join(score_array)
        return int(score)

    def get_crashed(self):
        return self._driver.execute_script("return Runner.instance_.crashed")
5. Installing the environment
Now we just need to install the environment by navigating into the gym-enviroments file and installing it via
$ cd PATH/TO/gym-environments
$ pip install -e .
Finally, we can call and create the DinoRun environment in python scripts with gym.make()
import gym
import gym_dinorun

gym.make("DinoRun-v0")

init_state = env.reset()
state, reward, info, done = env.step(0)
6. References
- Interface between browser and python https://medium.com/acing-ai/how-i-build-an-ai-to-play-dino-run-e37f37bdf153
- Creating
gymenvironment https://www.novatec-gmbh.de/en/blog/creating-a-gym-environment/ - Making a headless browser https://blog.testproject.io/2018/02/20/chrome-headless-selenium-python-linux-servers/
This professional article is composed by Mike Smyk. Mike is one of the Data Science team’s consultants at ADVISORI.
He combines expertise in Machine Learning, Data Analytics and Robotics.
Special thanks to An Hoang for his outstanding support for this article.


